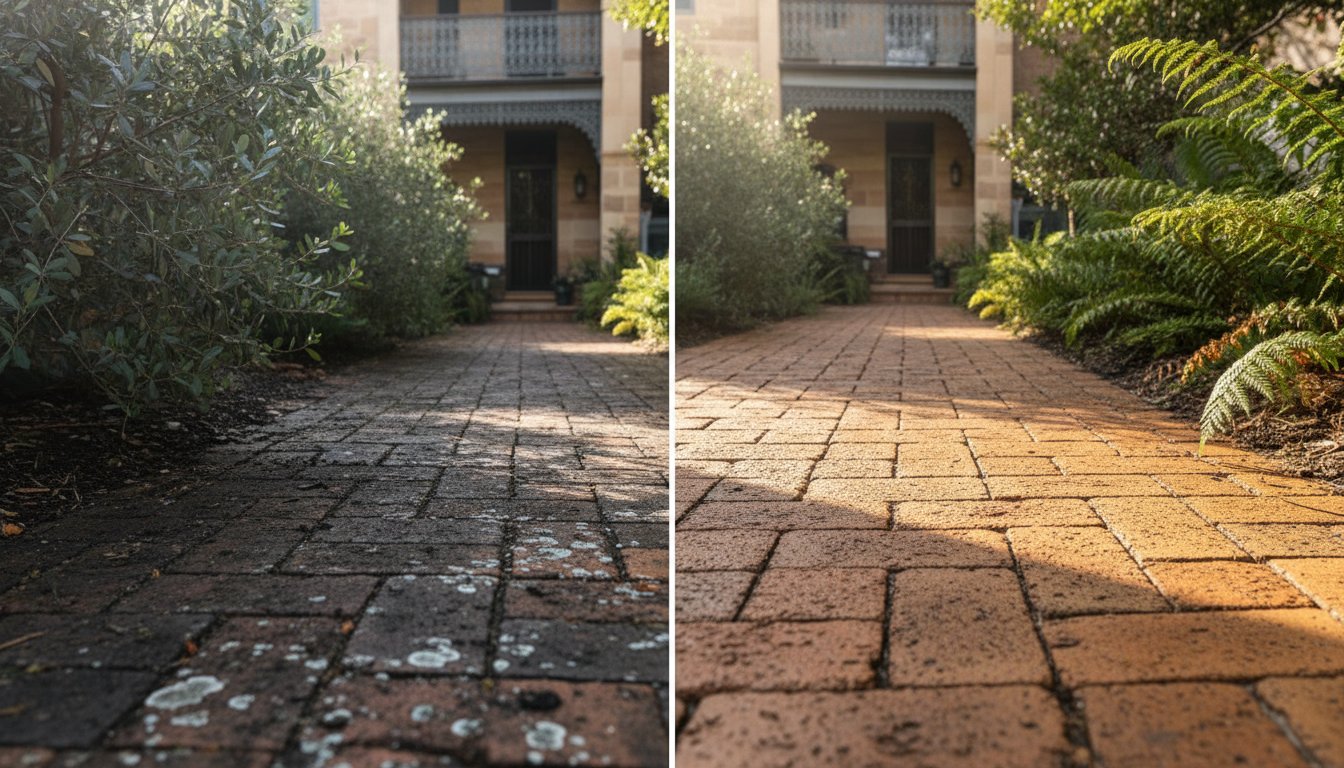
That stubborn grey-green crust creeping across your paving isn't just an eyesore — it's a sign that your outdoor surfaces are fighting a losing battle against nature. Understanding why lichen grows on your paving is the first step toward reclaiming the clean, attractive outdoor space you deserve. And you're far from alone in dealing with it; countless Australian homeowners find themselves scrubbing away at the same persistent growth season after season, often without lasting results.
It's frustrating, we get it. You've worked hard on your outdoor space, and watching lichen slowly spread across your driveway, pathways, or entertaining area feels like a constant uphill battle. Beyond the aesthetics, there's a real concern about whether it's quietly damaging your paving beneath the surface.
The good news is that lichen growth isn't inevitable, and it doesn't have to be permanent. In this article, you'll discover the natural conditions that allow lichen to thrive on paving surfaces, explore safe and effective removal methods, and learn practical preventative steps to keep your paving looking its best all year round.
Key Takeaways
- Understanding why lichen grows on your paving — including the role of moisture, sunlight, and nutrients — is the key to stopping it at the source rather than just treating the symptoms.
- Lichen isn't just a cosmetic problem; left unchecked, it can cause surface pitting and long-term structural damage to your paving materials.
- Safe and effective removal is possible with the right tools, products, and techniques — and you'll discover a step-by-step approach that won't harm your paving in the process.
- Regular maintenance and a few simple preventative habits can dramatically reduce the chances of lichen returning season after season.
- Professional removal services and eco-friendly treatment options offer long-lasting results that DIY scrubbing alone often can't achieve.
What is Lichen and Why Does it Grow on Paving?
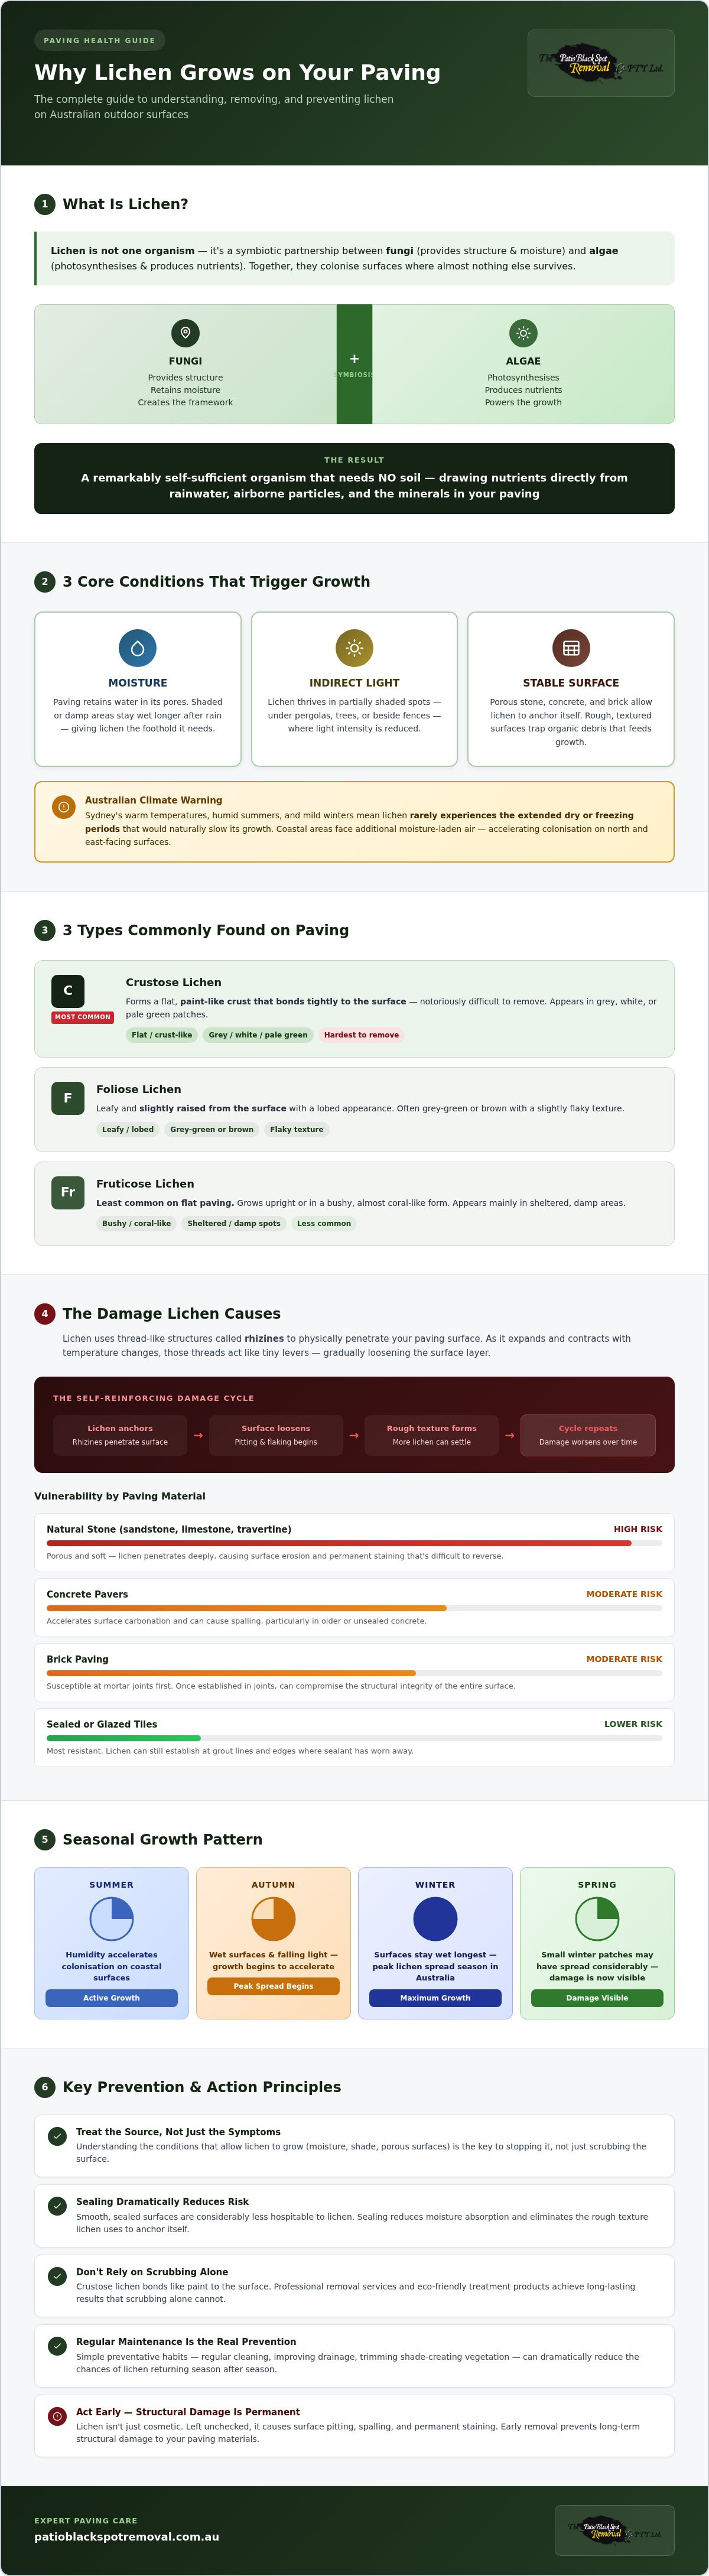
Lichen isn't a single organism. It's actually a partnership, a symbiotic relationship between fungi and algae (or sometimes cyanobacteria) living together as one. The fungus provides structure and retains moisture, while the algae photosynthesises and produces nutrients. Together, they form a remarkably self-sufficient organism that can colonise surfaces where almost nothing else survives, including your paving.
Understanding why lichen grows on your paving comes down to three core conditions: moisture, light, and a stable surface. Paving stones, concrete, and bricks offer exactly what lichen needs. They're porous enough to hold moisture, stable enough for lichen to anchor itself, and often positioned in spots that receive just the right amount of indirect sunlight. Unlike plants, lichen doesn't need soil. It draws nutrients directly from rainwater, airborne particles, and even the minerals in your paving material itself.
Types of Lichen Commonly Found on Paving
Not all lichen looks the same. The three main types you're likely to encounter on outdoor paving are:
- Crustose lichen: The most common on paving. It forms a flat, paint-like crust that bonds tightly to the surface and is notoriously difficult to remove. It typically appears in grey, white, or pale green patches.
- Foliose lichen: Leafy and slightly raised from the surface, with a lobed appearance. It's often grey-green or brown and has a slightly flaky texture.
- Fruticose lichen: Less common on flat paving, this type grows upright or in a bushy form. It tends to appear in more sheltered, damp areas and can look almost coral-like.
If you're seeing a flat, crusty growth that seems almost painted onto your paving, you're almost certainly dealing with crustose lichen. It's the type that causes the most frustration because scraping alone rarely removes it cleanly.
Environmental Factors Contributing to Lichen Growth
Sydney's climate creates near-ideal conditions for lichen. Warm temperatures, humid summers, and mild winters mean lichen rarely experiences the extended dry or freezing periods that would naturally slow its growth. Coastal areas face additional exposure to moisture-laden air, which accelerates colonisation on north and east-facing surfaces.
Shade plays a significant role too. Paving under trees, pergolas, or beside fences tends to stay damp longer after rain. That extended moisture retention gives lichen the foothold it needs. Certain paving materials, particularly natural stone and uncoated concrete, are more susceptible because their textured, porous surfaces trap both moisture and organic debris that feeds lichen growth. Smooth, sealed surfaces are considerably less hospitable.
Seasonal shifts matter as well. Lichen growth typically accelerates through autumn and winter in most Australian regions, when surfaces stay wet longer and sunlight intensity drops. By spring, what started as a small patch can have spread considerably.
The Damage Lichen Can Cause to Your Paving
Most homeowners underestimate lichen. It looks passive, almost decorative in a way, but beneath that grey-green crust, something destructive is quietly happening. Understanding why lichen grows on your paving is one thing; understanding what it does once it's established is another matter entirely.
Lichen attaches to paving surfaces using thread-like structures called rhizines, which physically penetrate the surface material. As lichen expands and contracts with temperature and moisture changes, those threads work like tiny levers, gradually loosening the surface layer. Over time, this causes pitting, flaking, and a roughened texture that makes future lichen growth even easier. It's a self-reinforcing cycle.
The damage doesn't affect all paving equally. Here's how different materials hold up:
- Natural stone (sandstone, limestone, travertine): Highly vulnerable. These materials are porous and soft enough for lichen to penetrate deeply, leading to surface erosion and permanent staining that's difficult to reverse.
- Concrete pavers: Moderately vulnerable. Lichen accelerates surface carbonation and can cause spalling, particularly in older or unsealed concrete.
- Brick paving: Susceptible at the mortar joints first. Once lichen establishes in the joints, it can compromise the structural integrity of the entire paved surface over time.
- Sealed or glazed tiles: The most resistant, though lichen can still establish at grout lines and edges where sealant has worn away.
Signs of Damage from Lichen
Visible damage isn't always obvious at first glance. Look closely for surface pitting or a rough, pockmarked texture where the paving was once smooth. Discolouration that persists even after scrubbing, hairline cracks forming along lichen colonies, and crumbling mortar joints are all red flags. If the affected area feels noticeably rougher underfoot than surrounding sections, the surface layer has likely already been compromised. At that point, a professional assessment is worth arranging before the damage deepens.
The Cost of Ignoring Lichen Growth
Delaying treatment rarely saves money. Repointing mortar joints, resurfacing natural stone, or replacing damaged pavers can run into thousands of dollars depending on the area affected and the material involved. Damaged paving also affects kerb appeal, which matters if you're planning to sell. Buyers and valuers notice neglected outdoor surfaces, and the impression is hard to walk back. Early intervention with the right treatment is almost always the cheaper path.
If you're unsure how far the damage has progressed, it's worth getting an expert eye on it sooner rather than later. Reach out to our team for a professional assessment and find out what treatment approach suits your specific paving material and situation.
Effective Methods for Removing Lichen from Paving
Knowing why lichen grows on your paving is half the battle. The other half is removing it correctly without making things worse. Scrubbing too aggressively on natural stone, or using the wrong chemical on unsealed concrete, can accelerate the very damage you're trying to prevent. The right approach depends on your paving material, the extent of the growth, and how much time you're willing to invest.
Before any treatment begins, preparation matters. Clear the area of furniture and debris, and wet the surface lightly with clean water. This prevents dry lichen fragments from becoming airborne and helps loosen the outer crust before you apply any product. If there are plants or garden beds nearby, cover them or wet them thoroughly first to dilute any product runoff.
DIY Removal Techniques
For light to moderate lichen growth, a few DIY approaches can deliver reasonable results:
- White vinegar solution: Mix undiluted white vinegar and apply directly to the affected area. Leave it for 10 to 15 minutes before scrubbing with a stiff-bristled brush. It's mildly acidic, which disrupts lichen's structure, but it's not suitable for natural limestone or marble, as acid can etch those surfaces.
- Baking soda paste: Mix baking soda with water to form a thick paste, apply to the lichen, and leave for 20 minutes before scrubbing. Gentler than vinegar, it works better on sensitive stone.
- Diluted bleach: Effective on concrete and brick, but use with caution. A 1-part bleach to 10-parts water ratio applied with a brush can kill lichen quickly. Rinse thoroughly afterwards and never use it on coloured or natural stone pavers, as it causes irreversible bleaching.
- Purpose-formulated removers: Products specifically designed for black spot and lichen removal on paving, such as those available through Patio Black Spot Remover for Natural Stone, offer targeted results that home remedies often can't match, particularly on porous or textured surfaces.
Always wear gloves and eye protection when working with any cleaning solution. Test any product on a small, inconspicuous area first and wait 24 hours before treating the full surface.
Post-removal care is just as important as the removal itself. Once the lichen is gone, rinse the surface thoroughly and allow it to dry completely before applying a quality sealer or preventative treatment. A product like Patio Black Spot Preventer for All Stone Types creates a barrier that makes it significantly harder for lichen to re-establish. Skipping this step is one of the most common reasons homeowners find themselves dealing with regrowth within a single season.
When to Hire Professionals
DIY methods work well for surface-level growth on accessible areas. But if lichen has penetrated deeply into porous stone, spread across a large surface, or returned repeatedly despite treatment, professional removal is the smarter investment. Professionals use commercial-grade equipment and eco-friendly formulations that penetrate more effectively and work faster than retail products.
When choosing a service provider, look for experience with your specific paving material, not just general pressure washing. Ask whether they use biodegradable or environmentally safe products, particularly if you have garden beds or stormwater drains nearby. A reputable provider will also advise on sealing and preventative maintenance as part of the service, not as an afterthought. That combination of thorough removal and follow-up protection is what delivers genuinely long-lasting results.
Preventing Lichen Growth on Your Paving
Removal solves today's problem. Prevention solves it permanently. Once you understand why lichen grows on your paving, the logic of prevention becomes clear: eliminate the conditions it relies on, and it simply can't establish itself in the first place. That means managing moisture, light, and surface texture before lichen gets a foothold rather than after.
Landscaping decisions have a larger impact than most homeowners realise. Overhanging trees and dense shrubs create the shaded, damp microclimates that lichen thrives in. Trimming back vegetation to improve airflow and sunlight exposure across your paving surfaces can meaningfully reduce moisture retention after rain. If you're planning new garden beds near paved areas, position taller plants where they won't cast extended shadow across the paving throughout the day.
Choosing the Right Paving Materials
Not all paving surfaces are equally vulnerable. Smooth, dense materials with a sealed surface give lichen very little to anchor onto. If you're planning new paving or replacing damaged sections, consider how the material's porosity and texture will affect long-term maintenance.
- Porcelain tiles: Low porosity and a smooth surface make these one of the most lichen-resistant options available. They're particularly well-suited to shaded entertaining areas.
- Sealed concrete pavers: A quality penetrating sealer applied after installation dramatically reduces moisture absorption and limits the organic debris that feeds lichen growth.
- Natural stone: Beautiful but porous. If you love sandstone or limestone, regular sealing isn't optional; it's essential maintenance. Reapply sealant every one to two years depending on foot traffic and exposure.
- Exposed aggregate: The textured surface traps moisture and debris efficiently, making it one of the higher-maintenance options in humid or shaded settings.
For existing paving, applying a preventative treatment after cleaning is the single most effective step you can take. Patio Black Spot Preventer for All Stone Types creates a protective barrier across the surface, reducing the moisture retention and organic matter accumulation that lichen depends on to survive.
Regular Maintenance Routines
Consistency matters more than intensity. A light inspection and sweep every two to three weeks removes leaf litter, soil, and organic debris before it decomposes into a nutrient source for lichen. Pay particular attention after autumn leaf falls, when organic matter accumulates quickly on paving surfaces.
Seasonal timing is important in Australian conditions. Schedule a thorough clean and preventative treatment application at the end of summer, before the cooler, wetter months arrive. This is when lichen growth accelerates, and a treated surface going into that period is far more resistant than an untreated one. A second inspection in early spring lets you catch any new colonies before they spread.
Check drainage regularly too. Water pooling on or beside paving after rain is a clear signal that moisture is sitting longer than it should. Clearing blocked drains and adjusting grading where possible reduces that risk considerably.
If you're unsure where to start or want a professional assessment of your paving's current condition, get in touch with our team and we'll help you build a maintenance plan suited to your specific surface and environment.
Conclusion: Maintaining Your Paving for Longevity
Lichen is patient. It establishes quietly, spreads slowly, and causes damage long before most homeowners realise there's a serious problem beneath that grey-green crust. By now, you understand why lichen grows on your paving: the combination of moisture retention, indirect light, a stable porous surface, and organic debris creates conditions that lichen exploits with remarkable efficiency. Remove those conditions, and you remove lichen's advantage.
The impacts are real and cumulative. Surface pitting, eroded mortar joints, stained natural stone, and compromised sealants don't fix themselves. Every season of inaction gives lichen more time to deepen its hold and widen its spread. The encouraging reality is that this is a problem with clear, practical solutions, and acting early keeps both the effort and the cost manageable.
Proactive care is the difference between a paving surface that lasts decades and one that needs costly repairs within a few years. That means:
- Cleaning and inspecting paving before the cooler, wetter months arrive
- Applying a quality preventative treatment after any removal to block re-establishment
- Managing shade and drainage around paved areas to reduce moisture retention
- Choosing the right sealer for your specific paving material and reapplying it on schedule
None of these steps are complicated. Consistency is what makes them effective.
Get Expert Help with Lichen Removal
Sometimes DIY methods aren't enough, particularly when lichen has penetrated deeply into natural stone, returned repeatedly after treatment, or spread across a large area. Professional removal services bring commercial-grade equipment, eco-friendly formulations, and the material-specific knowledge needed to treat your paving correctly without causing further damage. A professional assessment also identifies underlying issues, like poor drainage or failing sealant, that DIY scrubbing won't resolve.
Understanding why lichen grows on your paving is genuinely useful knowledge, but applying that knowledge effectively takes the right products, the right technique, and sometimes the right team. If you're dealing with persistent growth, visible surface damage, or simply want expert advice on the best approach for your specific paving material, don't put it off.
Contact us today for a free consultation and find out exactly what your paving needs to stay clean, protected, and looking its best for years to come.
Take Back Control of Your Paving Today
Why lichen grows on your paving comes down to a simple combination: moisture, shade, a porous surface, and time. Remove even one of those factors consistently, and you dramatically shift the odds in your favour.
The three things worth carrying forward from this article are straightforward. First, lichen causes real structural damage if left untreated, not just cosmetic issues. Second, the right removal method depends entirely on your paving material, so matching the treatment to the surface matters. Third, prevention through sealing and regular maintenance is far cheaper than repair.
You don't have to keep fighting the same battle every season. With the right approach, clean and protected paving is genuinely achievable, and it stays that way.
If you're ready to stop guessing and get a clear plan for your specific situation, contact us today for a free consultation on lichen removal. Our team will assess your paving, recommend the right treatment, and help you protect it for the long term. Your outdoor space is worth it.
Frequently Asked Questions
What is lichen and how does it grow on paving?
Lichen is a symbiotic organism formed by fungi and algae living together. The fungi provide structure and retain moisture, while the algae produce nutrients through photosynthesis. Lichen grows on paving by anchoring itself to porous surfaces using thread-like structures, drawing nutrients from rainwater, airborne particles, and the minerals within the paving material itself. It doesn't need soil, which is why it thrives where most other organisms can't.
How can I tell if lichen is damaging my paving?
Run your hand across the affected area. If the surface feels noticeably rougher or more pockmarked than surrounding sections, lichen has likely already caused surface damage. Other warning signs include persistent discolouration that won't scrub away, hairline cracks forming along lichen colonies, and crumbling mortar joints in brick paving. Staining on natural stone that remains after cleaning is a particularly strong indicator that lichen has penetrated below the surface layer.
What are the best methods for removing lichen from outdoor surfaces?
The right method depends on your paving material. White vinegar works on concrete and brick but will etch natural limestone or marble. Diluted bleach is effective on concrete but causes irreversible discolouration on coloured pavers. For porous or textured natural stone, purpose-formulated removers designed specifically for lichen and black spot deliver more reliable results than home remedies. Always test any product on a small inconspicuous area first and wear gloves and eye protection throughout.
Can I prevent lichen from growing on my paving?
Yes, and prevention is considerably easier than repeated removal. Understanding why lichen grows on your paving points directly to the solution: reduce moisture retention, improve sunlight exposure, and seal your surface. Trimming overhanging vegetation, clearing blocked drains, and applying a quality preventative treatment after cleaning all reduce lichen's ability to establish. A protective barrier product applied before the cooler, wetter months arrive gives your paving the best defence going into the season when lichen growth accelerates most.
When should I consider hiring a professional for lichen removal?
Professional removal makes sense when lichen has returned repeatedly despite DIY treatment, spread across a large area, or visibly penetrated into porous natural stone. If you're seeing surface pitting, persistent staining, or compromised mortar joints, a professional assessment can identify underlying issues like poor drainage or failing sealant that scrubbing alone won't fix. Professionals also use commercial-grade, eco-friendly formulations that penetrate more effectively than retail products, which delivers more durable results on stubborn or widespread growth.
Are there any eco-friendly options for lichen removal?
Eco-friendly removal is absolutely achievable. Baking soda paste is a gentle, non-toxic option suitable for sensitive stone surfaces. Purpose-formulated removers are also available in biodegradable options that break down safely without harming surrounding garden beds or entering stormwater systems. If you're hiring a professional service, ask specifically whether they use biodegradable or environmentally safe formulations, particularly if your paving is adjacent to garden beds, lawn areas, or stormwater drainage points.
How often should I clean my paving to prevent lichen growth?
A light inspection and sweep every two to three weeks is enough to remove the leaf litter and organic debris that feeds lichen. A thorough clean with a preventative treatment applied should happen at least once a year, ideally at the end of summer before cooler, wetter conditions arrive. A second inspection in early spring lets you catch any new colonies before they spread. High-risk areas, like shaded paving under trees, benefit from more frequent attention through autumn when leaf fall is heavy.